IMU add-on board for Sony Spresense microcontrollers
Introduction
Sony Semiconductor Solutions launched the highly anticipated Multi-IMU Add-on Board on February 26, 2025. This is an option for the IoT (Internet of Things) microcontroller board Spesense. Therefore, I try to connect this IMU Add-on board to Spresense and read the sensor values.
An IMU (Inertial Measurement Unit) is a device that measures three-dimensional inertial motion. The motion of an object can be described by a total of six pieces of data: acceleration in the three axial directions of XYZ, and angular velocity in the three axial directions of roll, pitch, and yaw. IMUs are widely used, for example, to detect when a smartphone screen is turned sideways and display the screen in landscape mode.
The great thing about this multi-IMU add-on board is that it combines 16 consumer IMUs in real time to achieve angular stability that can even detect the Earth’s rotation. I’ve been looking forward to the sale of this IMU for a long time.
Setup
To observe the output of this Multi-IMU Add-on board (hereinafter referred to as the IMU add-on), I connected it to Spresense and wrote the data reading software into Spresense.
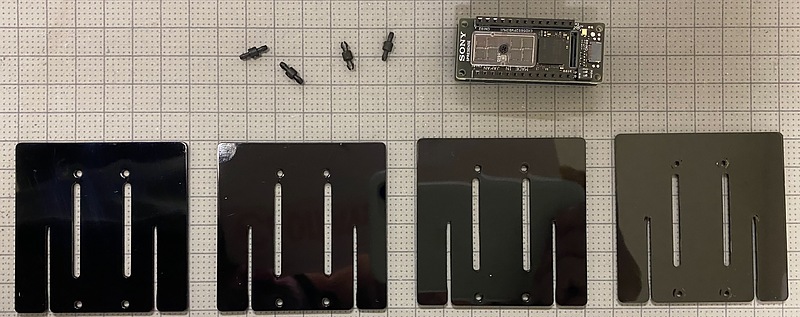
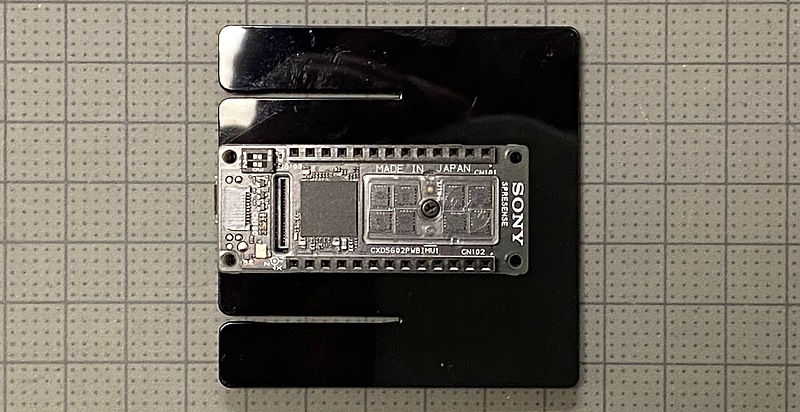
In addition to the main unit, the IMU add-on product case contains mini spacers. There were 4 IMUs and 4 plastic plates. There are 8 IMUs on the front of the IMU add-on and 8 IMUs on the back.

I didn’t know what the mini spacers and plastic plate were for. I decided they were to keep the Spresense board and IMU add-on level, and I stacked two plastic plates and attached them under the main board with the mini spacers.

There are two main ways to develop software with Spresense: (1) using the Arduino IDE (integrated development environment) and (2) using the SDK (software development kit) provided by Sony. With the former, we can easily write software to Spresense by copying and pasting the code and clicking the build button. However, there does not currently seem to be an Arduino library for this IMU add-on. Therefore, I will use the latter SDK to use this IMU add-on.
The setup method for the SDK is described in detail in the Spresense SDK Start Guide (CLI version) on the official website. Follow the instructions there and proceed with the setup from 1. Introduction to 3.4 Run “Hello, World!” so that the text “Hello, World!” is displayed on the serial terminal. I set up this SDK on my usual macOS.
During this setup process, I was prompted to update the bootloader. Therefore, I followed the instructions and updated the bootloader to Spresense firmware v3.3.0.
There’s nothing particularly difficult about it, but I was confused by the fact that while all commands are executed in the sdk directory, the directory set in the configuration is specified from the spresense directory, which is one level above the current directory. Since it is not specified from the current directory, tab key completion in zsh or bash does not work, which is a bit inconvenient.
Enter the commands as in the Start Guide to create the nuttx.spk file, and transfer it to the Spresense board with the flash.sh command. Creating this file took a few minutes on my PC.
Using the Multi-IMU Add-on Board
This SDK provides cxd5602pwbimu and cxd5602pwbimu_logger as sample code for the IMU add-on. These are located in spresense/examples. We will try them in this order.
cxd5602pwbimu is sample code that displays sensor output for a fixed period of time with fixed parameters such as 1920 Hz sampling. From spresense/examples/cxd5602pwbimu/Kconfig, we can see that the execution command is pwbimu. This is the command name to enter instead of hello in the previous example.
In the spresense/sdk directory, execute the following command to write the code to Spresense board.
tools/config.py examples/cxd5602pwbimu
make
tools/flash.sh -c /dev/tty.usbserial-1110 nuttx.spk
screen /dev/tty.usbserial-1110 115200
Where /dev/tty.usbserial-1110 is the USB serial port name of my PC for this Spresense board.
sat@imac:~/Documents/github/spresense$ cd sdk
sat@imac:~/Documents/github/spresense/sdk$ tools/config.py examples/cxd5602pwbimu
sat@imac:~/Documents/github/spresense/sdk$ make
Create version.h
LN: platform/board to /Users/sat/Documents/github/spresense/sdk/apps/platform/dummy
Register: pwbimu
Register: nsh
Register: sh
CPP:  /Users/sat/Documents/github/spresense/nuttx/boards/arm/cxd56xx/spresense/scripts/ramconfig-new.ld-> /Users/sat/Documents/github/spresense/nuttx/boards/arm/cxd56xx/spresense/scripts/ramconfig-new.ld.tmLD: nuttx
Generating: nuttx.spk
tools/cxd56/mkspk -c2 nuttx nuttx nuttx.spk;
File nuttx.spk is successfully created.
Done.
sat@imac:~/Documents/github/spresense/sdk$ tools/flash.sh -c /dev/tty.usbserial-1110 nuttx.spk
>>> Install files ...
install -b 115200
Install nuttx.spk
|0%-----------------------------50%------------------------------100%|
######################################################################

181152 bytes loaded.
Package validation is OK.
Saving package to "nuttx"
updater# sync
updater# Restarting the board ...
reboot
sat@imac:~/Documents/github/spresense/sdk$ screen /dev/tty.usbserial-1110 115200
NuttShell (NSH) NuttX-12.3.0
nsh>
NuttShell (NSH) NuttX-12.3.0
nsh> pwbimu
0.092992,26.591146,-0.01619748,-0.23048346,0.02748845,-0.07734343,0.33981058,10.76876831
0.093361,26.430176,0.00046417,-0.00264232,0.00019141,-0.61184335,0.34893215,10.55052567
0.093811,26.430176,-0.00673335,0.01806999,-0.00034304,-0.73535728,0.31970680,9.96086502
0.094345,26.430176,-0.07595222,0.18320066,-0.02274963,-0.17296591,0.33223009,10.11776829
0.094842,26.430176,-0.29470262,0.39317381,-0.11702106,0.17736650,0.37389147,10.16028023
...
1.080991,26.236328,0.00015397,0.00139313,-0.00030057,-0.56398875,0.21613172,9.78222084
1.081496,26.236328,0.00086656,0.00183487,-0.00041829,-0.56039059,0.21698044,9.79057312
1.081966,26.237793,0.00050225,0.00172483,-0.00011609,-0.55839735,0.22385406,9.77645874
1.082428,26.235840,0.00025167,0.00153740,-0.00010724,-0.56194043,0.22314039,9.77366066
Elapsed 0.989746288 seconds
1920 samples captured
Finished.
nsh>
According to the source code spresense/examples/cxd5602pwbimu/cxd5602pwbimu_main.c, it shows a timestamp, temperature, three angular velocities, and three accelerations from the left. This IMU add-on seems to have a temperature sensor.
for (p = outbuf; p < last; p++)
{
    printf("%.6f,%.6f,%.8f,%.8f,%.8f,%.8f,%.8f,%.8f\n",
            p->timestamp / 19200000.0f,
            p->temp,
            p->gx, p->gy, p->gz,
            p->ax, p->ay, p->az);
}
Next, run cxd5602pwbimu_logger. According to the source code, it seems that you can set the sampling rate and sensitivity, and you can also choose the output destination as a file or network.
printf("Usage: nsh> pwbimu_logger ([-s] <rate>) ([-a] <acc range>) "
        "([-g] <gyro range>) ([-f] <fifo num>) ([-o] <out dev>) "
        "([-d]) ([-h])\n");
printf(SPACE__ "-s: Sampling Rate 1920, 960, 480, 240, 120, 60, 30, 15\n"
        SPACE__ "-a: Accel Range 16, 8, 4, 2\n"
        SPACE__ "-g: Gyro Range 4000, 2000, 1000, 500, 250, 125\n"
        SPACE__ "-f: Fifo size 4, 3, 2, 1\n"
        SPACE__ "-o: Output Device 'uart', 'net', "
                "/path/to/file.bin, /path/to/file.txt\n"
        SPACE__ "-d: Force print the data to UART\n"
        SPACE__ "-h: Show this help\n");
As before, let’s run this code. The command name is pwbimu_logger.
tools/config.py examples/cxd5602pwbimu_logger
make
tools/flash.sh -c /dev/tty.usbserial-1110 nuttx.spk
screen /dev/tty.usbserial-1110 115200
nsh> pwbimu_logger
Start IMU Data logging: Rate:960 Accel DRagne:16 Gyro DRange:500 Fifo:4 Outdev:uart
00299ac7,41cb9c00,3c981d38,bc033675,3bbfbfe2,3f736004,3d938218,4113e5c8
0029eabb,41cb9c00,3cb778b2,3d642fe4,b9191f99,3f76abfe,3d6dba41,4112f6c4
002a3640,41cb9c00,3c930218,3dccfdb5,bbddb754,3eba40e0,3e758e85,4118d7fa
002a8056,41cb9c00,3c5d498e,3ddbf96a,bba6923c,bd9bdd02,3ec86e52,41214017
...
This code runs continuously. The output does not stop automatically. The defaults are 960 Hz sampling, acceleration range 16, angular velocity range 500, and FIFO (first input first output) size 4. This code uses a pointer reference to the output function to change the output destination and format, and the function log2uart is executed if no options are given. The results are the same as before: a timestamp, temperature, three angular velocities, and three accelerations, but they are expressed in hexadecimal (why…?).
fprintf(fp, "%08x,%08x,%08x,%08x,"
            "%08x,%08x,%08x,%08x\n",
            (unsigned int)dat[i].timestamp,
            ((conv_f2u_t)dat[i].temp).u,
            ((conv_f2u_t)dat[i].gx).u,
            ((conv_f2u_t)dat[i].gy).u,
            ((conv_f2u_t)dat[i].gz).u,
            ((conv_f2u_t)dat[i].ax).u,
            ((conv_f2u_t)dat[i].ay).u,
            ((conv_f2u_t)dat[i].az).u);
In my testing, I was not able to output to a file. Since you cannot create a new file with the cat command, it seems that you need to create the file in advance using another method.
Once the Arduino library for this IMU add-on is released, it will be fun to develop IMU apps quickly. For example, the decoding function for the disaster crisis management report message broadcast by the Quasi-Zenith Satellite (Michibiki) using the Spresense built-in GNSS was first released as an SDK version, and the Arduino library was released shortly thereafter.
Adding add-ons to Spresense is fun
I also have a GNSS addon for Spresense. In the future, it will be possible to use the GNSS addon and IMU addon for integrated positioning.
If you have the GNSS add-on, you can use the MRAM included in it as general-purpose memory.
System: Add the feature to use GNSS RAM (640KB) as general-purpose memory. Please refer to Using GNSS RAM memory for the details.
The flash memory built into Spresense has a short lifespan for writing, but the MRAM (Magnetoresistive Random Access Memory) in the GNSS add-on has high durability against writing. However, the writing speed of MRAM is 1/8 that of flash memory. The GNSS function and MRAM function of the GNSS add-on board are mutually exclusive.
I also have an Ethernet add-on. I will try to observe the Earth’s rotation for a long time using them.
Conclusion
I tried using the SONY Spresense multi-IMU add-on board. It’s fun to use a high-performance IMU.